


COPYRIGHT © 2022 COFF International Co., ltd. ALL RIGHTS RESERVED

Starting your homebrew journey feels exciting. You get to make your own beer right at home. With the right home brew beer equipment, you can create craft beer that fits your taste. Each piece of homebrew equipment helps you brew beer safely and easily. Clean tools keep your homebrew fresh and delicious. Homebrewing lets you explore new flavors, and you learn a lot by doing it yourself. Grab your home brew beer equipment, invite friends over, and enjoy craft beer together. You will see how much fun home brewing can be!
Tip: Homebrew brings people together. Sharing beer you made at home always feels special.

You need a fermenter to start your homebrew journey. This is where your beer comes to life. The fermenter, sometimes called a fermenting vessel, holds your wort while yeast turns sugars into alcohol. Picking the right fermenter makes homebrewing easier and helps you brew beer with fewer problems.
Here’s a quick look at the most common fermenter types for beginners:
| Fermenter Type | Budget Range | Pros | Cons | Why Recommended for Beginners |
|---|---|---|---|---|
| Plastic Bucket | $10-$20 | Affordable, easy to use and clean, sometimes includes spigot, fits in fridges for temp control | Scratches easily, trub collects on flat bottom, limited temp control, cannot be pressurized | Typical starting point due to low cost and simplicity |
| Carboy (Plastic or Glass) | $30-$50 | Affordable, simple fermentation chamber, glass is sanitary and scratch-resistant, allows observation of fermentation | Difficult to clean, no spigot on glass, trub collects on flat bottom, cannot be pressurized | Popular choice for beginners for affordability and simplicity |
| Plastic Conical | $100-$200 | Easy to use, allows trub dumping and yeast harvesting, pressure rated for fermenting under pressure, carbonation possible | Plastic can scratch, clear plastic allows UV exposure, less durable than stainless steel | Good upgrade option offering advanced features at moderate price |
| Stainless Steel Bucket | $200-$300 | Easy to clean and sanitize, durable, keeps light out, coned bottom for trub separation, spigot for easy sampling | Pricier, limited pressure rating (1-2 PSI), not a true conical, no yeast dumping | Recommended upgrade for durability and sanitation |
You can start with a plastic bucket or carboy. These fermenters are simple and budget-friendly. They help you learn the basics of homebrew beer equipment without spending too much. As you get more experience, you might want to try a plastic conical or stainless steel fermenter. These give you more control and make cleaning easier. No matter which fermenting vessel you choose, always keep it clean. This step keeps your beer tasting fresh and safe.
Tip: Always use a fermenter that fits your batch size. Too much empty space can let in oxygen and spoil your beer.
The brew kettle is where you boil your wort. You mix water, malt, and hops in this pot to start the brewing process. A good brew kettle helps you control the temperature and keeps your beer safe from burning or sticking.
Here’s a table to help you pick the right kettle for homebrewing:
| Kettle Type/Size | Price Range (USD) | Notes |
|---|---|---|
| 40qt Aluminum Pot | Around $24 | Entry-level, weld-free bulkhead option |
| 35qt Stainless Steel Kettle | Around $70 | Mid-range quality suitable for beginners |
| 16qt Boil Kettle | Around $40 | Used in beginner kits |
Most homebrew starter kits include a kettle between 16 and 35 quarts. Stainless steel kettles last longer and are easier to clean. Aluminum pots cost less and work well for small batches. When you brew beer, make sure your kettle is big enough to hold all your ingredients. This helps prevent messy boil-overs.
You will use your brew kettle every time you make beer. It is one of the most important pieces of home brew beer equipment. If you want to upgrade later, look for kettles with built-in thermometers or spigots. These features make brewing even easier.
An airlock and stopper protect your beer during fermentation. You place the stopper in the top of your fermenting vessel, then fit the airlock into the stopper. This simple tool keeps your beer safe from bacteria, mold, and wild yeast.
Here’s why you should always use an airlock and stopper when you homebrew:
Using an airlock and stopper is a small step that makes a big difference. They help you brew beer with fewer problems and better results. Most home brew beer equipment kits include these tools because they are so important for homebrewing success.
Note: If you skip the airlock, you risk contamination and off-flavors. For just a few dollars, you get peace of mind and better beer.
Sanitizer is your secret weapon for making great beer at home. You want every batch of homebrew to taste fresh and clean. Germs and wild yeast can ruin your beer if you skip this step. Even a tiny bit of dirt or bacteria can spoil the flavor. That’s why you always need to sanitize your equipment before you start brewing.
You have a few choices when it comes to sanitizers. Some work fast, while others take a little longer. Here’s a handy table to help you pick the right one for your homebrew setup:
| Sanitizer | Type/Composition | Contact Time | Dilution Rate | Rinse Required | Notes |
|---|---|---|---|---|---|
| Star San | Phosphoric acid & dodecylbenzenesulfonic acid | 1-2 minutes | 1 oz per 5 gallons | No | Most effective chemical sanitizer, cost-effective, quick sanitizing time |
| Iodophor | Iodine-based | ~10 minutes (12.5 ppm) | 1 tablespoon per 5 gallons | No | No-rinse, solution reusable up to a week, stains fabric, easy to use |
| Saniclean | Phosphoric acid-based (non-foaming) | 3 minutes | 1 oz per 3 gallons | No | Not recommended for aluminum equipment |
| Chlorine bleach | Chlorine-based | ~5 minutes | 2.5 tablespoons per 5 gallons | Yes | Effective on glass, can cause off-flavors in plastic, corrosive to stainless steel, kills yeast if not rinsed properly |
| Heat methods | Boiling wort, oven dry heat | 15-20 minutes | N/A | N/A | Effective but time-consuming, can weaken bottles, dishwashers not recommended |
You don’t need to go overboard with sanitizing. Every batch of homebrew will have some tiny amount of contamination, but that’s normal. If you use a good sanitizer and pitch your yeast correctly, you usually won’t notice any problems. The yeast in your beer will outcompete most of the bad stuff. Just remember, clean equipment means better beer.
Tip: Always sanitize anything that touches your beer after the boil. This includes fermenters, spoons, siphons, and bottles.
Transferring your beer from one container to another is a big part of homebrewing. You want to move your beer without stirring up the sediment at the bottom. That’s where a siphon or auto-siphon comes in handy.
A traditional siphon works, but it can be tricky. You have to start the flow by sucking on the tube or using a pump. This method can feel awkward and sometimes even a little risky. You don’t want to get any beer in your mouth or risk breathing in something you shouldn’t.
Auto-siphons make this job much easier. You just pump the auto-siphon a few times, and the beer starts flowing. No mouth suction needed! This keeps your beer cleaner and safer. You also get a steady flow, so you can move your beer quickly and with less mess.
Here’s why many homebrew fans love auto-siphons:
If you want to make your homebrew process smoother, try an auto-siphon. It’s a small upgrade that makes a big difference.
When your beer finishes fermenting, you need to get it into bottles. A bottling bucket makes this step much easier. This special bucket has a spigot at the bottom, so you can fill each bottle without lifting heavy containers or making a mess.
You pour your finished beer into the bottling bucket. Then you add priming sugar, which helps your beer carbonate in the bottle. The spigot lets you fill each bottle from the bottom up. This helps prevent splashing, which can add unwanted oxygen to your beer.
Here’s how a bottling bucket helps you:
You’ll find that using a bottling bucket saves time and keeps your homebrew tasting great. It’s a must-have for anyone who wants to bottle their own beer at home.
Note: Always sanitize your bottling bucket before use. This keeps your beer safe and fresh.
When you finish brewing, you need the right bottles and caps to store your beer. Picking the right bottle helps keep your beer fresh and safe. Most homebrewers use two main types of bottles: one-way bottles and returnable bottles. One-way bottles feel lighter and work well for single use. Returnable bottles are heavier and last longer, but you see them less often now because they are harder to find and reuse.
You can also choose flip-top bottles, sometimes called Grolsch-style bottles. These bottles have a rubber gasket and a metal hinge. They seal tightly and you can use them again and again. Many homebrewers love flip-top bottles because they are easy to open and close. They cost more, but you save money over time since you do not need to buy new caps.
Some people recycle store-bought bottles, like kombucha bottles. This saves money, but you must check that the caps have good liners. Good liners keep your beer carbonated and fresh. Specialty bottles, such as stout or Boston round bottles, come in different shapes and sizes. You can buy them in bulk to save money.
Tip: Always use thick, high-quality glass bottles. Thin or poor-quality bottles can break under pressure, especially if your beer has a lot of bubbles.
For caps, you have several choices. Crown caps are the most common. They work on most bottles, even twist-off ones. Some people think you need special caps for twist-off bottles, but that is not true. You can also use swing-top caps, which come with flip-top bottles. These caps are reusable and make bottling easier. Screw caps, cork stoppers, and T-top stoppers are less common for beer, but you might see them for other drinks.
If you want to keep your beer safe and tasty, pick bottles and caps that seal tightly. This keeps out air and holds in the bubbles. Your beer will taste better and last longer.
A bottle capper makes bottling your beer much easier. You use it to seal crown caps onto your bottles. There are two main types: hand cappers and bench cappers.
Hand cappers, like the two-lever style, help you crimp caps quickly. You hold the bottle with one hand and press down with the other. This tool works well, but it can feel awkward if you are working alone. Sometimes, the cap might go on crooked if you do not line it up just right.
Bench cappers make the job even easier. You place the bottle on the base and pull a lever. You only need one hand, so you can use your other hand to steady the bottle. Bench cappers need less force and give you a smoother action. You can also adjust them for different bottle sizes. Many homebrewers find that bench cappers make bottling faster and more fun.
Note: A good capper saves you time and keeps your beer safe from leaks or flatness.
A thermometer is a must-have tool for brewing beer at home. You use it to check the temperature during brewing and fermentation. Keeping your beer at the right temperature helps the yeast work well and gives you better flavor.
Ales usually need to ferment between 68 and 72 °F. Lagers need cooler temperatures, around 45 to 55 °F. If your beer gets too warm or too cold, you might get strange flavors or the yeast might not finish its job. That is why you need to check the temperature often.
You can use a stick-on thermometer strip or a probe thermometer. Stick-on strips go right on your fermenter and show you the temperature at a glance. Probe thermometers give you a more exact reading. Some advanced setups use temperature controllers that turn on a heater or cooler to keep your beer just right.
When you watch the temperature, you can make changes if needed. You might use an ice bath, a wet towel, or a fridge to cool things down. You might use a heating pad to warm things up. Keeping your beer in the right range helps you get the taste you want every time.
Tip: Always check the temperature before you add yeast. This helps your beer start strong and finish clean.
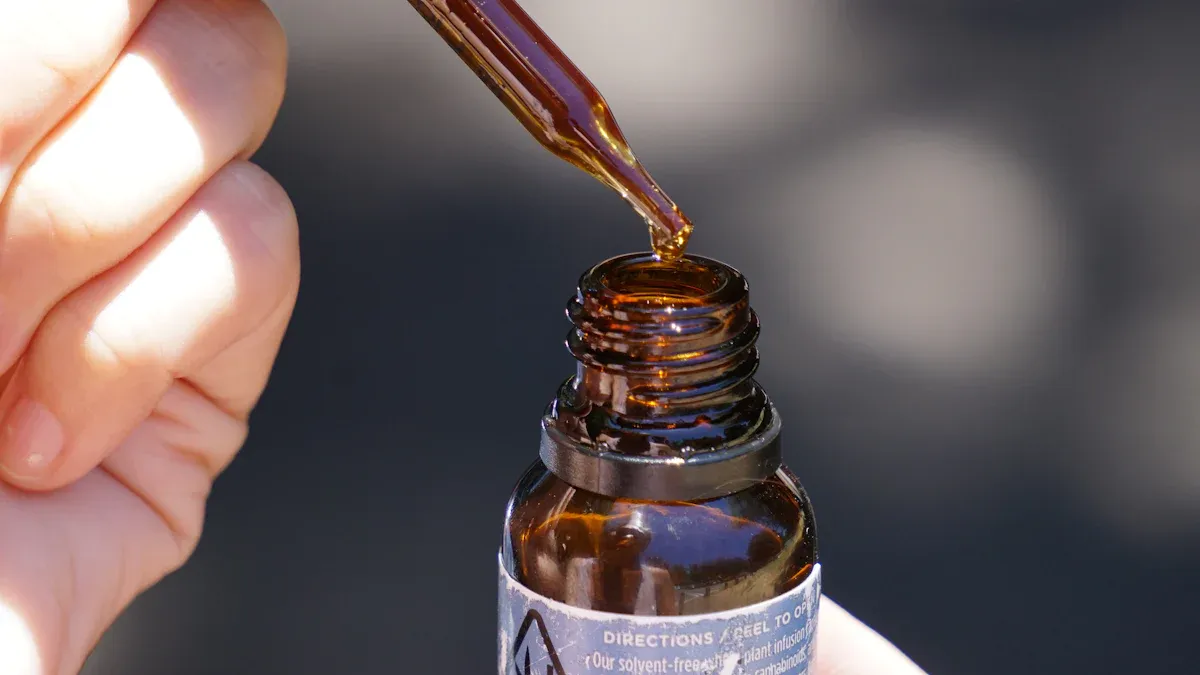
A hydrometer is one of those tools that makes you feel like a real scientist in your kitchen. You use it to measure the specific gravity of your beer. This number tells you how much sugar is in your brew. When you first mix your ingredients, the liquid is thick with sugar. As the yeast eats the sugar and turns it into alcohol, the gravity drops. By checking the specific gravity at the start and end of fermentation, you can see how much sugar turned into alcohol. This helps you know when your beer is ready to bottle.
Some hydrometers, like the Tilt hydrometer, make things even easier. You can drop it right into your fermenter. It sends real-time data to your phone or tablet. You can watch your beer change without opening the fermenter. This keeps your beer safe from germs and wild yeast. You can even save your data to the cloud and share it with friends. This technology gives you more control and helps you make better beer every time.
A hydrometer gives you confidence. You don’t have to rely on bubbles in the airlock or guesswork. You get real numbers that show how your beer is changing. This tool helps you make beer that tastes just the way you want.
Tip: Always sanitize your hydrometer before and after each use. This keeps your beer clean and safe.
You need a good stirring spoon or paddle to mix your ingredients. When you brew beer, you want everything to blend well. A sturdy spoon or paddle helps you stir the malt, hops, and water together. This step makes sure the sugar dissolves and the flavors mix evenly.
You can choose from different materials. Stainless steel spoons are strong and easy to clean. Some brewers like wooden paddles for their classic feel. Heat-resistant plastic and bamboo are also popular. Each material works well, so you can pick what feels best in your hand. Stainless steel stands out because it lasts a long time and resists stains.
When you stir your beer, you help the yeast get the oxygen it needs. This helps the yeast grow strong and start fermentation quickly. You also break up any clumps in your malt or hops. A good stir at the right time leads to better beer.
Note: Always sanitize your spoon or paddle before you use it. This simple step keeps your beer tasting fresh.
Accurate measurement is the secret to making great beer. You want every batch to taste the same, so you need to measure your water and ingredients carefully. A measuring cup or jug helps you do this. Most homebrewers use a 1-gallon jug to add water to the brew kettle. You can mark the jug to show different levels. For smaller amounts, a 1-quart measuring cup works well.
When you measure your water and malt, you control the strength and flavor of your beer. If you guess, your beer might turn out too strong or too weak. Using a measuring cup or jug takes away the guesswork. You know exactly how much water goes into your kettle. This helps you hit your target batch size every time.
Accurate measurements also help you follow recipes. You can repeat your favorite beer or try new styles with confidence. When you know your numbers, you can make changes and improve your process. Consistency is key if you want to share your beer with friends or enter competitions.
Tip: Always double-check your measurements before you start brewing. This habit saves time and helps you make better beer.
If you want to start brewing beer at home, a homebrewing starter kit makes everything simple. You get all the tools and ingredients you need in one box. You don’t have to guess what to buy or worry about missing something important. With a good kit, you can focus on learning and having fun.
Most homebrewing starter kits come with the basics for your first batch. Here’s what you usually find inside:
You’ll notice that cleaning and sanitizing tools are always included. This step matters a lot. Clean gear keeps your beer from getting spoiled by germs or wild yeast. Most kits also give you priming sugar or carbonation drops. You add these to each bottle before capping, so your beer gets that nice fizz.
When you open your kit, you’ll see that the malt extract comes in a tin or pouch. Warm it up a bit to make pouring easier. Mix it with sugar and water in your fermenter. Stir well, then sprinkle in the yeast. Use your hydrometer to check the starting gravity. This number tells you how much sugar is in the mix. Now, let your beer ferment at a steady temperature, usually between 64°F and 78°F (18°C to 26°C).
After a week or two, your beer is ready to bottle. Carefully transfer it to bottles, leaving the sediment behind. Drop in some priming sugar or carbonation drops, then cap each bottle. Store them in a cool, dark place. In a few weeks, you’ll have fresh, fizzy beer to share.
Tip: Always read the instructions in your kit before you start. Each kit might have a few special steps or tips.
Many beer kits, like the popular Mr. Beer making starter kit, include everything you need—even bottles. Once you finish your first batch, you only need to buy refill packs or extract recipe kits for your next brew. This makes it easy to try new styles without buying new equipment every time.
Here’s a quick table to show what you get with most beginner beer kits:
| Item | Purpose |
|---|---|
| Fermenting Vessel | Holds your beer during fermentation |
| Malt Extract & Ingredients | Main flavor and sugar source |
| Brewing Sugar/Enhancer | Boosts alcohol and mouthfeel |
| Yeast | Turns sugar into alcohol and bubbles |
| Bottles & Caps | Stores your finished beer |
| Cleaning/Sanitizing Tools | Keeps everything safe and clean |
| Hydrometer | Measures sugar and tracks fermentation |
| Priming Sugar/Carbonation | Adds fizz to your bottled beer |
| Instructions | Guides you step by step |
You don’t need fancy gear to get started. A homebrewing starter kit gives you confidence and helps you learn the basics. As you brew more, you can try different beer kits or experiment with extract recipe kits to find your favorite flavors. Brewing at home feels rewarding, and you’ll love sharing your own craft beer with friends.
You can’t make homebrew without a fermenter. This piece of equipment is where the magic happens. When you brew beer, you pour your wort into the fermenter and add yeast. The fermenter gives yeast a safe place to turn sugars into alcohol and bubbles. You want your beer to taste great every time, so you need a fermenter that keeps everything under control.
Tip: Always clean and sanitize your fermenter before you start brewing. This step keeps your beer safe and tasty.
The brew kettle is the heart of your homebrew setup. You use it to boil your wort and mix your ingredients. This step is key for brewing because it shapes the flavor and body of your beer.
You want a brew kettle that fits your batch size and heats evenly. This way, you get the best results every time you brew beer.
Sanitizer is your best friend in homebrew. If you skip this step, your beer can get spoiled by wild yeast or bacteria. These tiny invaders can change the taste and smell of your beer in a bad way. Even if the beer is safe to drink, it won’t taste right.
Note: Most experienced brewers say sanitizing is the most important step in brewing. Don’t skip it if you want great beer every time.
When you start fermenting your beer, you need to keep it safe from germs and wild yeast. That’s where the airlock comes in. You fill the airlock with water or a sanitizing solution, then fit it into the stopper on your fermenter. As your beer ferments, it produces carbon dioxide. The airlock lets this gas escape by bubbling through the liquid. At the same time, it blocks outside air and contaminants from getting in.
This simple tool creates a barrier. The pressure inside your fermenter pushes bubbles out, but nothing can come back in. Some brewers use sanitizing solutions like alcohol in the airlock for extra protection. You can choose from different styles, like three-piece airlocks or single-piece bubblers. Both work well to keep your beer safe and let you watch the bubbles as fermentation happens.
Tip: Always check the liquid level in your airlock. If it dries out, it can’t protect your beer.
Transferring your beer without stirring up sediment or adding air is important. A siphon helps you move your beer from the fermenter to the bottling bucket or bottles. To start, fill the siphon tube with water. This helps you avoid pulling in air. Keep both ends of the tube at the same level until the cane is under the liquid, then lower the other end into your clean bucket.
You can use an auto-siphon for easier flow. Some brewers use a mesh filter to keep out sediment. If you want to avoid oxygen, try purging your receiving vessel and siphon with CO2 before you start. Always make sure your siphon system has tight connections and no leaks. Try not to break the flow once you start, since that can let in air.
Bottling your beer is the final step before you get to enjoy it. Start by adding the right amount of priming sugar to your bottling bucket. This sugar helps your beer carbonate in the bottle. Use clean, brown or green glass bottles to protect your beer from light. Make sure everything is sanitized.
Fill each bottle using a bottling wand or spigot. Leave a little space at the top. Cap the bottles right away using a bottle capper. A tight seal keeps your beer fresh and fizzy. Store your bottles in a cool, dark place so the flavors can develop and the carbonation can build up.
Note: Cleanliness is key. Always sanitize your bottles, caps, and tools to keep your beer tasting great.
When you brew beer at home, you want to know what is happening inside your fermenter. Measuring and monitoring tools help you track your beer’s progress and make sure everything goes as planned. These tools let you check things like temperature and sugar levels. You can spot problems early and fix them before they ruin your batch.
Here’s a handy table to show you which tools work best for different setups:
| Brewery Type | Recommended Tools | Key Parameters Tracked | Notes and Benefits |
|---|---|---|---|
| Medium/Large | PLAATO Pro + PLAATO Edge | Gravity, temperature, fermentation rate, batch consistency | Connects to brewery software, gives real-time data, easy to scale up |
| Small Brewery | PLAATO Pro | Gravity, temperature, fermentation rate, batch consistency | Simple to use, lots of data, fits smaller spaces |
| Homebrewer | Accelerometer Hydrometer | Gravity, temperature (via angle calculation) | Budget-friendly, sends info to your phone, needs cleaning |
| Any Setup (Basic) | Thermowell & Probe Sensors | Temperature only | Tracks temperature, works with digital controllers or fridges |
You want to keep an eye on a few key numbers: specific gravity, temperature, fermentation rate, and sometimes pH or CO₂ pressure. These numbers tell you if your yeast is working and if your beer is on track. Some advanced systems, like BrewIQ Dashboard, let you watch these numbers in real time from your phone or computer. You get alerts if something goes wrong, so you can act fast.
Tip: Continuous monitoring helps you catch stuck fermentation early and keeps your beer quality high.
Using these tools means you don’t have to guess. You get clear data, batch after batch. This makes your brewing more consistent and helps you learn what works best for your favorite recipes. Even simple tools, like a thermometer or hydrometer, make a big difference. If you want to take your brewing to the next level, try adding a digital sensor or smart hydrometer to your setup. You’ll feel more confident and your beer will taste even better!

Before you start making beer, you need to get your homebrew equipment ready. Cleaning and sanitizing are two different steps, but both matter a lot in the brewing process. If you skip these, your beer could spoil.
Here’s a simple list of instructions to follow:
Tip: Always keep a spray bottle of sanitizer nearby. It makes the process faster and easier.
Now you get to the fun part of making beer. Brewing the wort is where you mix water, malt, and hops to create the base for your beer. The right equipment makes a big difference in this process.
Stainless steel kettles work best for brewing. They last a long time, resist rust, and heat evenly. This helps you control the temperature and get the most flavor from your ingredients. You start by heating water in your kettle. Add your malt and stir well. Bring the mix to a boil, then add hops at different times for bitterness and aroma.
Here’s a quick look at the main stages:
| Brewing Stage | What You Do | Why It Matters |
|---|---|---|
| Milling | Crush malted grain | Exposes starch for sugar conversion |
| Mashing & Lautering | Mix with water, convert starches | Creates sweet wort for beer making |
| Boiling | Boil wort, add hops | Sterilizes and adds flavor |
| Whirlpooling | Spin wort to separate solids | Clarifies wort before cooling |
Follow the instructions in your recipe for each step. Good brewing habits lead to better beer every time.
After boiling, you need to cool your wort fast. This step keeps your beer safe from germs and helps the yeast work well. There are a few ways to do this in the homebrew process.
You can also use cold top-up water if you did a partial boil. This brings the temperature down quickly. Always sanitize anything that touches the wort after boiling. This includes your fermenter, tubing, and any tools you use for transferring.
Note: Cooling your wort quickly and keeping everything clean helps you make beer that tastes fresh and delicious.
Now your wort is ready to become beer. This is where the real transformation happens. You pour the cooled wort into your fermenter, add yeast, and let nature do its work. The yeast eats the sugars and turns them into alcohol and bubbles. You want to give your yeast the best chance to make great beer.
Several things help you get a successful fermentation:
Tip: Keep your fermenter in a spot where the temperature stays steady. This helps your beer turn out just right.
You will see bubbles in the airlock as the yeast works. When the bubbles slow down, your beer is almost ready for the next step.
Bottling your beer is the last big step before you get to taste your hard work. You want to make sure your beer is fizzy and fresh. Here’s how you do it:
Here’s a quick table to help you remember the key steps:
| Technique | Description |
|---|---|
| Use of Priming Sugar | Add sugar solution before bottling to create natural carbonation in the beer. |
| Controlling Carbonation | Adjust sugar amount for the right level of fizz in your beer. |
| Storage Temperature | Keep bottles warm for a few weeks, then chill to finish. |
| Yeast Activity | Make sure yeast is present to carbonate your beer. |
| Sugar Types | Try corn sugar, table sugar, or dry malt extract for different results. |
| Use of Calculators | Use tools to get the sugar amount just right for your beer batch. |
Note: Always use clean bottles and caps. This keeps your beer safe and tasting great.
When you follow these steps, you get beer that is bubbly, tasty, and ready to share.
When you get comfortable with your basic homebrew setup, you might want to try some upgrades. These tools help you make better beer and make the process easier. Many experienced homebrewers add new gear as they learn more. Here are some of the most popular upgrades you can try.
A wort chiller cools your hot wort fast after boiling. Quick cooling helps you avoid unwanted flavors and keeps your beer clear. You can pick from different types, like immersion chillers, counterflow chillers, or plate chillers. Each one works a bit differently, but all help you chill your wort in less time.
If you use extract brewing, a wort chiller helps you get your wort to yeast-pitching temperature quickly. This step is important for both beginners and advanced brewers.
Tip: Clean your wort chiller before and after every use to keep your beer safe.
A secondary fermenter gives your beer a place to clear and age after the first fermentation. You transfer your beer from the primary fermenter to the secondary one. This step helps you get clearer beer and can improve the taste.
Many homebrewers who start with extract brewing find that a secondary fermenter helps them make cleaner, tastier beer. You do not need this for every batch, but it is a great upgrade if you want to experiment.
A digital thermometer gives you quick, accurate temperature readings. You use it to check your wort, mash, or fermenter. Keeping the right temperature helps your yeast work well and gives you better results.
| Thermometer Type | Features | Why Use It? |
|---|---|---|
| Digital Probe | Fast, easy to read | Accurate temps for brewing |
| Infrared | No contact needed | Great for quick checks |
| Stick-on Strip | Simple, always visible | Good for fermenters |
A digital thermometer is a small upgrade, but it makes a big difference. You can spot problems early and fix them before they ruin your batch.
Note: Always sanitize your thermometer before using it in your wort or fermenter.
If you want to serve your homebrew like the pros, a CO2 system for kegging is a great upgrade. You can skip the bottles and pour your craft beer straight from a tap. This setup uses a CO2 tank, regulator, and keg. The CO2 pushes your beer out of the keg and keeps it fresh and fizzy.
Here’s what you need for a basic kegging kit:
You fill the keg with your finished beer, seal it, and connect the CO2. The system carbonates your beer faster than bottle conditioning. You can adjust the pressure for more or less fizz. Kegging saves time and makes it easy to share your craft beer at parties. Cleaning is simple, too. You just rinse the keg and lines after each use.
Tip: Always check for leaks before you start. A small leak can waste your CO2 and leave your beer flat.
A grain mill lets you crush your own malted barley. This tool gives you more control over your recipes. You can pick how fine or coarse you want your grains. Freshly milled grain makes your craft beer taste better.
You can choose from hand-crank mills or electric mills. Hand-crank mills cost less and work well for small batches. Electric mills save time if you brew often. Many homebrewers add a grain mill to their kit when they want to try all-grain brewing.
If you want to experiment with new recipes, a grain mill is a smart upgrade for your brewing kit.
Once you feel confident with basic brewing, you might want to try an advanced brewing kit. These kits come with extra tools and features. You get more control over your brewing process and can make bigger batches.
An advanced kit might include:
These kits help you brew like a pro at home. You can try new styles and improve your skills. If you love making craft beer, an advanced kit opens up more options for creativity.
Note: Start with a simple kit, then upgrade as you learn. Each new tool helps you make better beer.
When you start your home brewing journey, you do not need fancy gear. You can make great beer with just a few basic tools. Many beginners use a starter kit that includes a fermenting bucket, bottling bucket, autosiphon, bottle capper, hydrometer, and some small tools. This setup helps you learn the process without spending too much money.
You might want to brew a few batches before you buy more equipment. As you get better, you will know what upgrades make brewing easier for you. Maybe you want a bigger brew pot or a digital thermometer. Upgrading step by step lets you enjoy each new tool and keeps things fun.
Tip: Focus on learning the basics first. You can always add more equipment as you gain experience.
You do not have to spend a lot to start brewing beer at home. Many home brewing stores offer kits that fit most budgets. Look for a 5-10 gallon brew pot and a basic starter kit. These items cover everything you need for your first batches.
Here are some ways to save money:
A simple setup helps you avoid big mistakes and keeps your first brews affordable.
Some things can make home brewing harder for beginners. Try to avoid these common mistakes:
| Mistake | Why to Avoid It |
|---|---|
| Skipping sanitation | Dirty tools can ruin your beer |
| Ignoring temperature | Yeast needs the right temperature to work well |
| Using old ingredients | Stale hops or malt can give off-flavors |
| Not measuring properly | Guessing leads to weak or strong beer |
| Using untreated tap water | Chlorine can cause bad tastes in your beer |
Always keep your tools clean, watch your temperatures, and use fresh ingredients. Take notes on each batch so you can learn and improve. If you start simple and pay attention to these tips, you will enjoy brewing beer at home and get better with every batch.
Finding the right place to buy your homebrewing equipment makes a big difference. You want gear that lasts, works well, and helps you brew with confidence. Let’s look at your best options for getting quality homebrew supplies.
1. Local Homebrew Shops
You might have a homebrew store nearby. These shops let you see and touch the equipment before you buy. You can ask questions and get advice from people who know brewing. Many local shops also offer classes or brewing events. If you like hands-on help, this is a great place to start.
2. Online Retailers
Shopping online gives you lots of choices. Big websites like Amazon and specialty stores like MoreBeer or Northern Brewer carry everything you need. You can compare prices, read product details, and order from home. Just check shipping costs and delivery times before you buy.
3. Direct from Manufacturers
If you want high-end or custom equipment, try buying straight from the manufacturer. For example, NingBo COFF Machinery Co., Ltd designs and builds top-quality brewing gear. You get expert support and products made for serious brewers. Many manufacturers offer advice on setup and use.
Here’s a quick table to help you decide:
| Source | Pros | What to Watch For |
|---|---|---|
| Local Homebrew Shop | Personal help, see products | Limited selection |
| Online Retailer | Wide variety, easy shopping | Shipping, returns |
| Manufacturer (COFF) | Custom gear, expert support | Minimum order, lead time |
Tip: Always check if the seller offers good customer service and clear return policies. Quality gear and support make brewing more fun.
Take your time, compare your options, and pick the source that fits your needs. With the right equipment, you’ll enjoy every step of your homebrewing adventure!
You want to start brewing beer at home? Here’s a quick checklist to help you gather the must-have gear. These items form the backbone of every homebrewer’s setup. Check them off as you go!
| Equipment | What It Does | Why You Need It |
|---|---|---|
| Fermenter | Holds your beer during fermentation | Turns wort into beer |
| Brew Kettle | Boils your ingredients | Extracts flavors, sterilizes |
| Airlock & Stopper | Seals fermenter, lets gas escape | Prevents contamination |
| Sanitizer | Cleans all your equipment | Keeps beer safe and tasty |
| Siphon/Auto-Siphon | Transfers beer between containers | Avoids stirring up sediment |
| Bottling Bucket | Makes bottling easier | Reduces mess and oxidation |
| Bottles & Caps | Stores your finished beer | Keeps beer fresh and fizzy |
| Bottle Capper | Seals bottles with caps | Locks in carbonation |
| Thermometer | Checks temperature | Controls fermentation |
| Hydrometer | Measures sugar and alcohol levels | Tracks fermentation progress |
| Stirring Spoon/Paddle | Mixes ingredients | Ensures even blending |
| Measuring Cup/Jug | Measures water and ingredients | Keeps recipes accurate |
✅ Tip: Always double-check your list before you brew. Missing one item can slow you down!
Once you feel comfortable with the basics, you might want to try some upgrades. These tools help you brew like a pro and make the process smoother.
🎯 Note: You don’t need every upgrade right away. Start simple, then add new gear as you grow your skills.
You don’t need fancy gear to brew great beer at home. Many brewers start with a simple kit—just a fermenting bucket, a kettle, and a few basic tools. You can use a propane burner and a recipe kit with premeasured ingredients. Focus on fresh ingredients, good cleaning, and steady temperatures. Many pros began with these basics and made awesome beer. Take that first step, have fun, and enjoy learning. Homebrewing feels rewarding and easy to start. Why not give it a try?
Remember: Skill and care matter more than expensive equipment. Start simple, upgrade as you grow!
You need a fermenter to start. It holds your beer while yeast turns sugar into alcohol. Without it, you cannot make beer at home. Always keep it clean for the best results.
You can use a large kitchen pot if it holds enough liquid. Make sure it is stainless steel or food-safe aluminum. Avoid pots with nonstick coatings. Clean it well before brewing.
First, wash everything with warm water and mild soap. Rinse well. Next, use a no-rinse sanitizer on all surfaces that touch your beer. Let the equipment air dry. Clean gear keeps your beer fresh.
A hydrometer helps you track sugar levels and know when fermentation finishes. You can brew without one, but it makes the process easier and more reliable. It also helps you measure alcohol content.
You can brew beer in one day. Fermentation usually takes one to two weeks. After bottling, wait two to four weeks for carbonation. In about a month, you can enjoy your homemade beer.